Convert many single photos to a timelapse movie
Table of contents
- Introduction
- Requirements
- Virtual Dub Mod
- Video Codec
- Single Pictures
- Concatenate your pictures
- Step 1 – Start Virtual Dub
- Step 2 - Load the first picture
- Step 3 - Set the frame rate
- Step 4 - Set and determine the resolution
- Adding black beams
- Crop your pictures
- Step 5 - Chose the way of compression
- Step 6 - Add audio (optional)
- Step 7 - Output your video
- Comments
Introduction
If you want to create timelapse videos, you usually take a lot of pictures in a given interval. Often you take some thousand photographs, which you want to convert into a stunning timelapse video.
In this tutorial I want to show you a simple possibility how you can bond all you single pictures together, and what you have to look out for when converting your pictures to a timelapse video.
Top
Requirements
Virtual Dub Mod
First of all, you will need the free software Virtual Dub Mod. This is a small but powerful tool, which can edit and create video files.
The latest version can always be obtained on the following site: http://virtualdubmod.sourceforge.net
You don't even have to install this little tool, just run the exe directly after unzipping the archive.
Video Codec
For encoding you video file you will need a suitable video codec. It will compress the video you want to create, so that it uses less space on your harddisk. Compression is not only important to safe your free space, but also if you plan to publish your video on a video platform like YouTube or Vimeo, because they cannot handle uncompressed, huge files. Last you couldn't even play such a huge file because the amount of data is too big.
Which codec you choose is dependent on some aspects. My suggestions are:
- xVid – free, but not so wide spread
- DivX – free, very widely spread, but adds a watermark to your videos
You should also notice that the DivX Codec provides many profiles which make it possible to play your file on other units than your PC (e.g. Blu-Ray and DVD players) - the unit only has to support the profile you chose (mostly this is noted directly on the unit).
Installation of those codecs should not be a problem, as they all have install assistens which lead you through the installation process.
Single Pictures
The most important thing you will need are your single pictures, which you want to convert into a timelapse video. You can use JPEGs directly out of your camera, or of course you can develop RAW files and then use the created JPEGs. All pictures which you want to use should be in the same directory.
An important thing is that your pictures are accurately numbered. There cannot be a gap somewhere. The numeration has to be ordered in the way you want the single pictures to get bonded togheter in your timelapse movie.
If this is not the case, you can do so with the help of a very small but effective tool: Ant Renamer gives you many ways to rename all your files with just one click. One possibility is to number you pictures, what is exactly what you'll ned.
Another important thing to check is, if your pictures are all of the same resolution. Otherwise Virtual Dub Mod will not be able to bond your pictures together.
Top
Concatenate your pictures
If all the mentioned requirements are complied, you can bond your pictures together to a video:
Step 1 – Start Virtual Dub
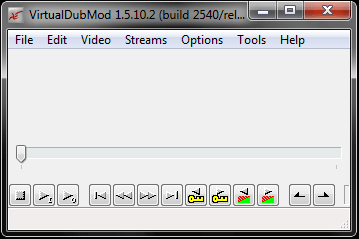
After you have started Virtual Dub Mod, the following user interface welcomes you:
Top
Step 2 - Load the first picture
The easiest way to add your pictures to the video is via Drag'n' Drop. Just drag the first picture of your picture sequence to the Virtual Dub window.
Virtual Dub then automatically scans for more pictures to come in the same directory. Because your pictures are well numbered, all the pics should be added. You can easily check, if the import process caught all your pictures by dragging the time line to the outer right and then have a look at the small laben in the lower right corner:
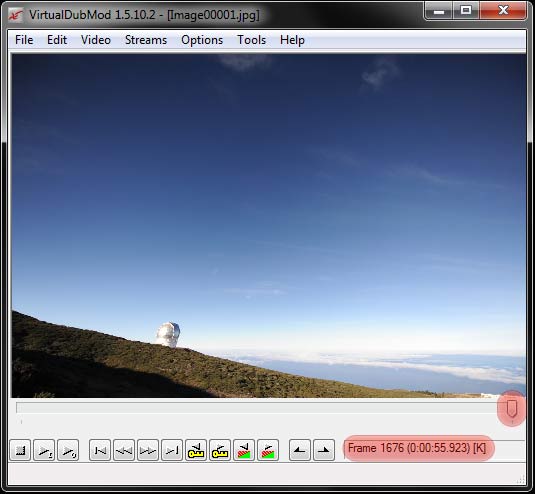
You can also check, if the order of your picture is correct. Just drag the timeline slowly back and forth a bit. If you do this, you can see how your pictures will behave in your video. Of course this is a bit jerky, but it is enough to tell if everything was imported fine or not and to get a first impression.
Top
Step 3 - Set the frame rate
Before you can output the pictures as a video, you have to make some settings.
First of all we determine and set the frame rate. The frame rate tells you how many pictures per second will appear and so can be used to change the playback speed. To set the frame rate click on "Video", then "Frame rate".
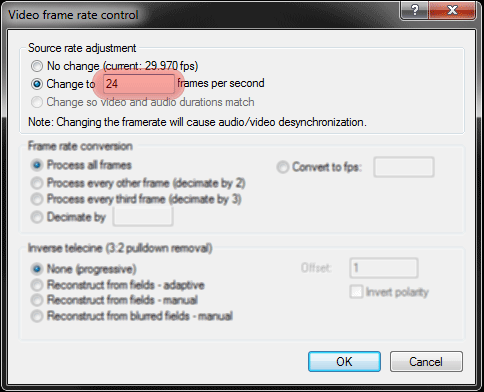
If you want to achieve a liquid playback, you'll need at least 24 pictures per second. Everything below will be noticed by our eyes and therefore should be avoided. More than 30 pictures per second only make sense if the timelapse video should be played back faster. The following table gives you a feeling for how many pictures you need at which frame rate, and how long your resulting video will be:
| No of pictures | 24 fps | 25 fps | 30 fps |
| 500 Bilder | 0:21 | 0:20 | 0:17 |
| 1000 Bilder | 0:42 | 0:40 | 0:22 |
| 2000 Bilder | 1:24 | 1:20 | 1:07 |
| 5000 Bilder | 3:28 | 3:30 | 2:47 |
Fps = frames/pictures per second
Top
Step 4 - Set and determine the resolution
If you take your photos with a modern camera, the pictures you take usually will be greater than 10Mp. This high resolution is not suitable for timelapse videos, it's just too much. There are no displays which could display the whole resolution, and the players could not even play the video file because there is too much data to process.
But which resolution do you use? It depends. What are you planning to do with your video? Nowadays video portals like YouTube and Vimeo accept High Definition videos. So it can't be a bad idea to chose a resolution which is quite high.
For reference the following list contains common resolutions:
- 1920x1080 – FullHD resolution
- 1280x720 – small HD resolution, „HD Ready“
- 720x480 – 16:9 DVD resolution
- 480x320 – iPod touch resolution
If you know which resolution you want to use, just tell it VirtualDub. Click on "Video", then "Filters", and add a new filter by clicking on the "Add"-Button on the right. A list appears, chose "resize" and confirm. Following interface will appear:
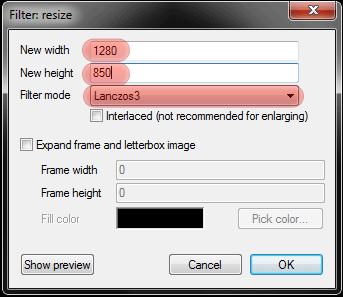
Set your resolution there. Filter mode should be set to "Lanczos3" which is the best filter for shrinking your pictures, what should be what you want. It has the highest quality, but you'll have to pay for this with your CPU time.
Very important if you set the resolution is, to keep the original aspect ratio! Unfortunately there is no way to keep it automatically, so you have to tell Virtual Dub on your own. You'll have to calculate a bit for that.. Let's do it together on an example:
Your origin files have a resolution of 4288x2848 pixels. Your target resolotion should be the "small" HD resoltuion, which means 1280x620 pixels. So let's calculate the new height of your pictures, so that we keep the original aspect ratio: (2848/4288)*1280=850. As you can see, the height is too much, it won't fit into the small HD resolution. 1280x850 pixels is a resolution which many players and video portals will deny, so we will have to take care of this.
You have two choises:
Top
1. Add black beams
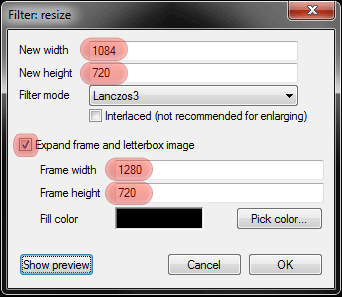
If you want to prevent all information which is contained in your pictures and don't want to crop them, you will have to add beams to the video. First of all, you have to calculate the correct resultion of your video: (4288/2848)*720=1084. The resolution we need is 1084x720px. No information will get lost and the aspect ration is kept.
Now you have to make some settings in the resite filter: Target resoltion is 1084x720px. Check the „Expand Frame and Letterbox Image“ Box, which basically means to expand your pictures with black beams. Now you enter the resolution, your video file should have at the end. In our example this would be 1280x720px. Last you could change the color of the black bars, if you want to.
Top
2. Crop your pictures
The second possibility to achieve the target resolution is, to crop you pictures appropriate. The way you do this in VirtualDub Mod is the following one:
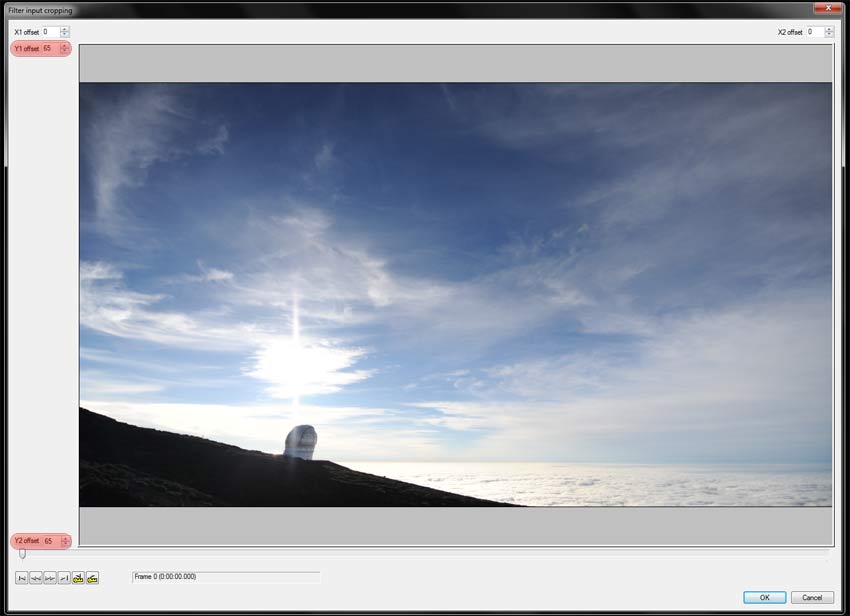
First of all you enter the resolution, which is the aspect ration kept resolution of your target resolution. That means for our example: 1280x850px. Enter this resolution in the settings for the resize filter.
After confirming and closing the resize filter, you add another filter. This time you chose "null transform" from the list. This filter just does nothing, but allows you to crop the video. To do so, you select the just added null transform filter and click on the "Cropping.." Button on the right.
We have to chaneg the height of the video of 850px to 720px, so we need to cut off 130px of height. The following picture shows you, how you can cut 65px at each the top and the bottom of your video:
The gray beams show where your beams will be in your video. Don't worry about the color, they are always gray in this preview.
Step 5 - Chose the way of compression
The last step before you can save your pictures as a video file is to chose the video codec. Just click on "Video", then "Compression". A list of all available Codecs will appear. Chose the codec you have determined to be the best for your use. Double click on it to change the settings of the codec. You should at least set the bitrate! The higher the bitrate, the better the quality will be, but the larger the file.
Step 6 - Add audio (optional)
If you already have a suitable background music for your timelapse video, then you can now directly add it to your video. Just click on "Streams", then "Stream List". Click on "Add" on the right and browse the file you want to use as background music.
Step 7 - Output your video
After all those settings were made, you are now ready to convert your images to a timelapse movie. Just click on "File", then "Save As" and chose a filename. The encoding process will begin, that means your video will be generated and compressed, cropped and resized.
This process can take some minutes or even hours. It depends on the chosen codec, the quality you required for the codec, the number of pictures, and of course on the CPU you are using. But it is worth waiting!
Top

#298 - 11/9/2025 4:35 AM from Carson Groves
Struggling to get targeted leads to your Spacelapse Net website? Watch this: https://www.youtube.com/shorts/8emL4whbdyM
#297 - 11/9/2025 3:55 AM from Ulysses Braden
Which keywords and locations do you need traffic from for spacelapse.net ? Check our traffic network to see what kind of volume we have for your keywords and locations: https://cutt.ly/MtqiYc0S Then start a 7 day free trial of our targeted traffic service that is powered by AI, no contracts, cancel at any time.
#296 - 11/7/2025 8:56 PM from Barrett Garran
Which keywords and locations do you need traffic from for spacelapse.net ? Check our traffic network to see what kind of volume we have for your keywords and locations: https://cutt.ly/atqiYvJ0 Then start a 7 day free trial of our targeted traffic service that is powered by AI, no contracts, cancel at any time.
#295 - 11/7/2025 6:31 PM from Latia Headley
Unlock more targeted leads with our AI! Watch this short video to get started: https://www.youtube.com/watch?v=UEooLHpFYW0
#294 - 11/3/2025 8:15 AM from Jesus La Trobe
Attract high-quality visitors to your site with our AI-driven traffic solution, far more affordable than traditional paid advertising. Ready to boost your conversions? https://cutt.ly/4r56Z53S
#293 - 10/21/2025 10:10 PM from Don Seaver
Ready to drive targeted visitors to your Spacelapse Net site? This quick video explains how our AI works: https://www.youtube.com/watch?v=VOdZEKK52Rw
#292 - 10/19/2025 5:12 PM from Ivory Yencken
Struggling with a lack of website visitors? Our smart AI pulls perfect visitors using keywords and geographic focus from continents to local streets. Desiring higher profits, lively website traffic, or stronger digital reach? We fine-tune it to suit your vision. Enjoy a 7-day free trial period with no contract. Join now: https://cutt.ly/Sr3e4wYE
#291 - 10/18/2025 11:09 PM from Jeanna Dawkins
Capture increased leads for your spacelapse.net website by using AI on Instagram. If you're looking to boost more traffic, produce leads, and amplify your brand's reach, you can find more information and start a no-cost trial here: https://cutt.ly/cr9BMVfU This is an AI-powered Instagram growth service that: -Grows followers with targeted, high-quality audiences. -Boosts engagement through advanced AI algorithms. -Targets users based on hashtags and accounts they follow. -Eliminates time by automating repetitive Instagram tasks. Our service emphasizes on genuine, organic growth—without bots, without fake followers. It’s perfect for brands like yours that want to convert Instagram into a lead generation engine. Best of all, our service is provided on a month-by-month subscription basis so you can stop at any point you like. No contracts and a 7 day free trial.
#290 - 10/17/2025 4:12 PM from Jamaal Herzog
Is your Spacelapse Net website missing out on leads? See how our AI can fix that: https://www.youtube.com/watch?v=VOdZEKK52Rw
Page 1 of 30